|
|
Post by bunbun / Hank on Jan 21, 2018 21:23:51 GMT -5
I hear that. Sometimes you're just better off doing it yourself than having to explain everything to your "assistant" who knows nothing and yet keeps asking "what is this...Why is this...What if we..." and the more you try to explain it the dumber the questions get.
I have one of my gear head buddies like that. He'll ask me how do I do...(fill in the blank) I will explain it all to him and then he goes and does exactly the opposite of what I just told him. And I'm quite content to just sit back and watch him bust his ass doing something the hardest way possible. It's great fun, lotta laughs.
HANK.
|
|
|
|
Post by Sir Trevor on Jan 22, 2018 20:28:41 GMT -5
Mine asks a question, then while I am trying to answer the question, she interrupts me with her ideas of what the answer might be. After 2 or 3 times I have to say 'If you will listen for a minute I can explain it to you'.
|
|
|
|
Post by bunbun / Hank on Jan 23, 2018 18:01:12 GMT -5
Most women are that way. They are "the world greatest authority on everything" so you can't tell them anything cuz they already know EVERYTHING there is to know about it. even if they've NEVER done the job before in their life.
Some guys are like that also. My buddy Mark for example. I will have done the job a hundred time, Mark, zero, yet he will NOT listen to what I tell him he will follow his own path and do what ever the hell he wants, sometimes it works, most of the time NOT!
Learn from the mistakes of others, you won't live long enough to make em all yourself, and it's cheaper. "well, that DIDN'T work for him, why do I think it will work for me? Trevor repaired his bricks with a flour and water paste and the bricks all fell apart. Maybe I should try that, it seems cheaper than buying motor!
HANK.
|
|
|
|
Post by Sir Trevor on Jan 25, 2018 21:14:55 GMT -5
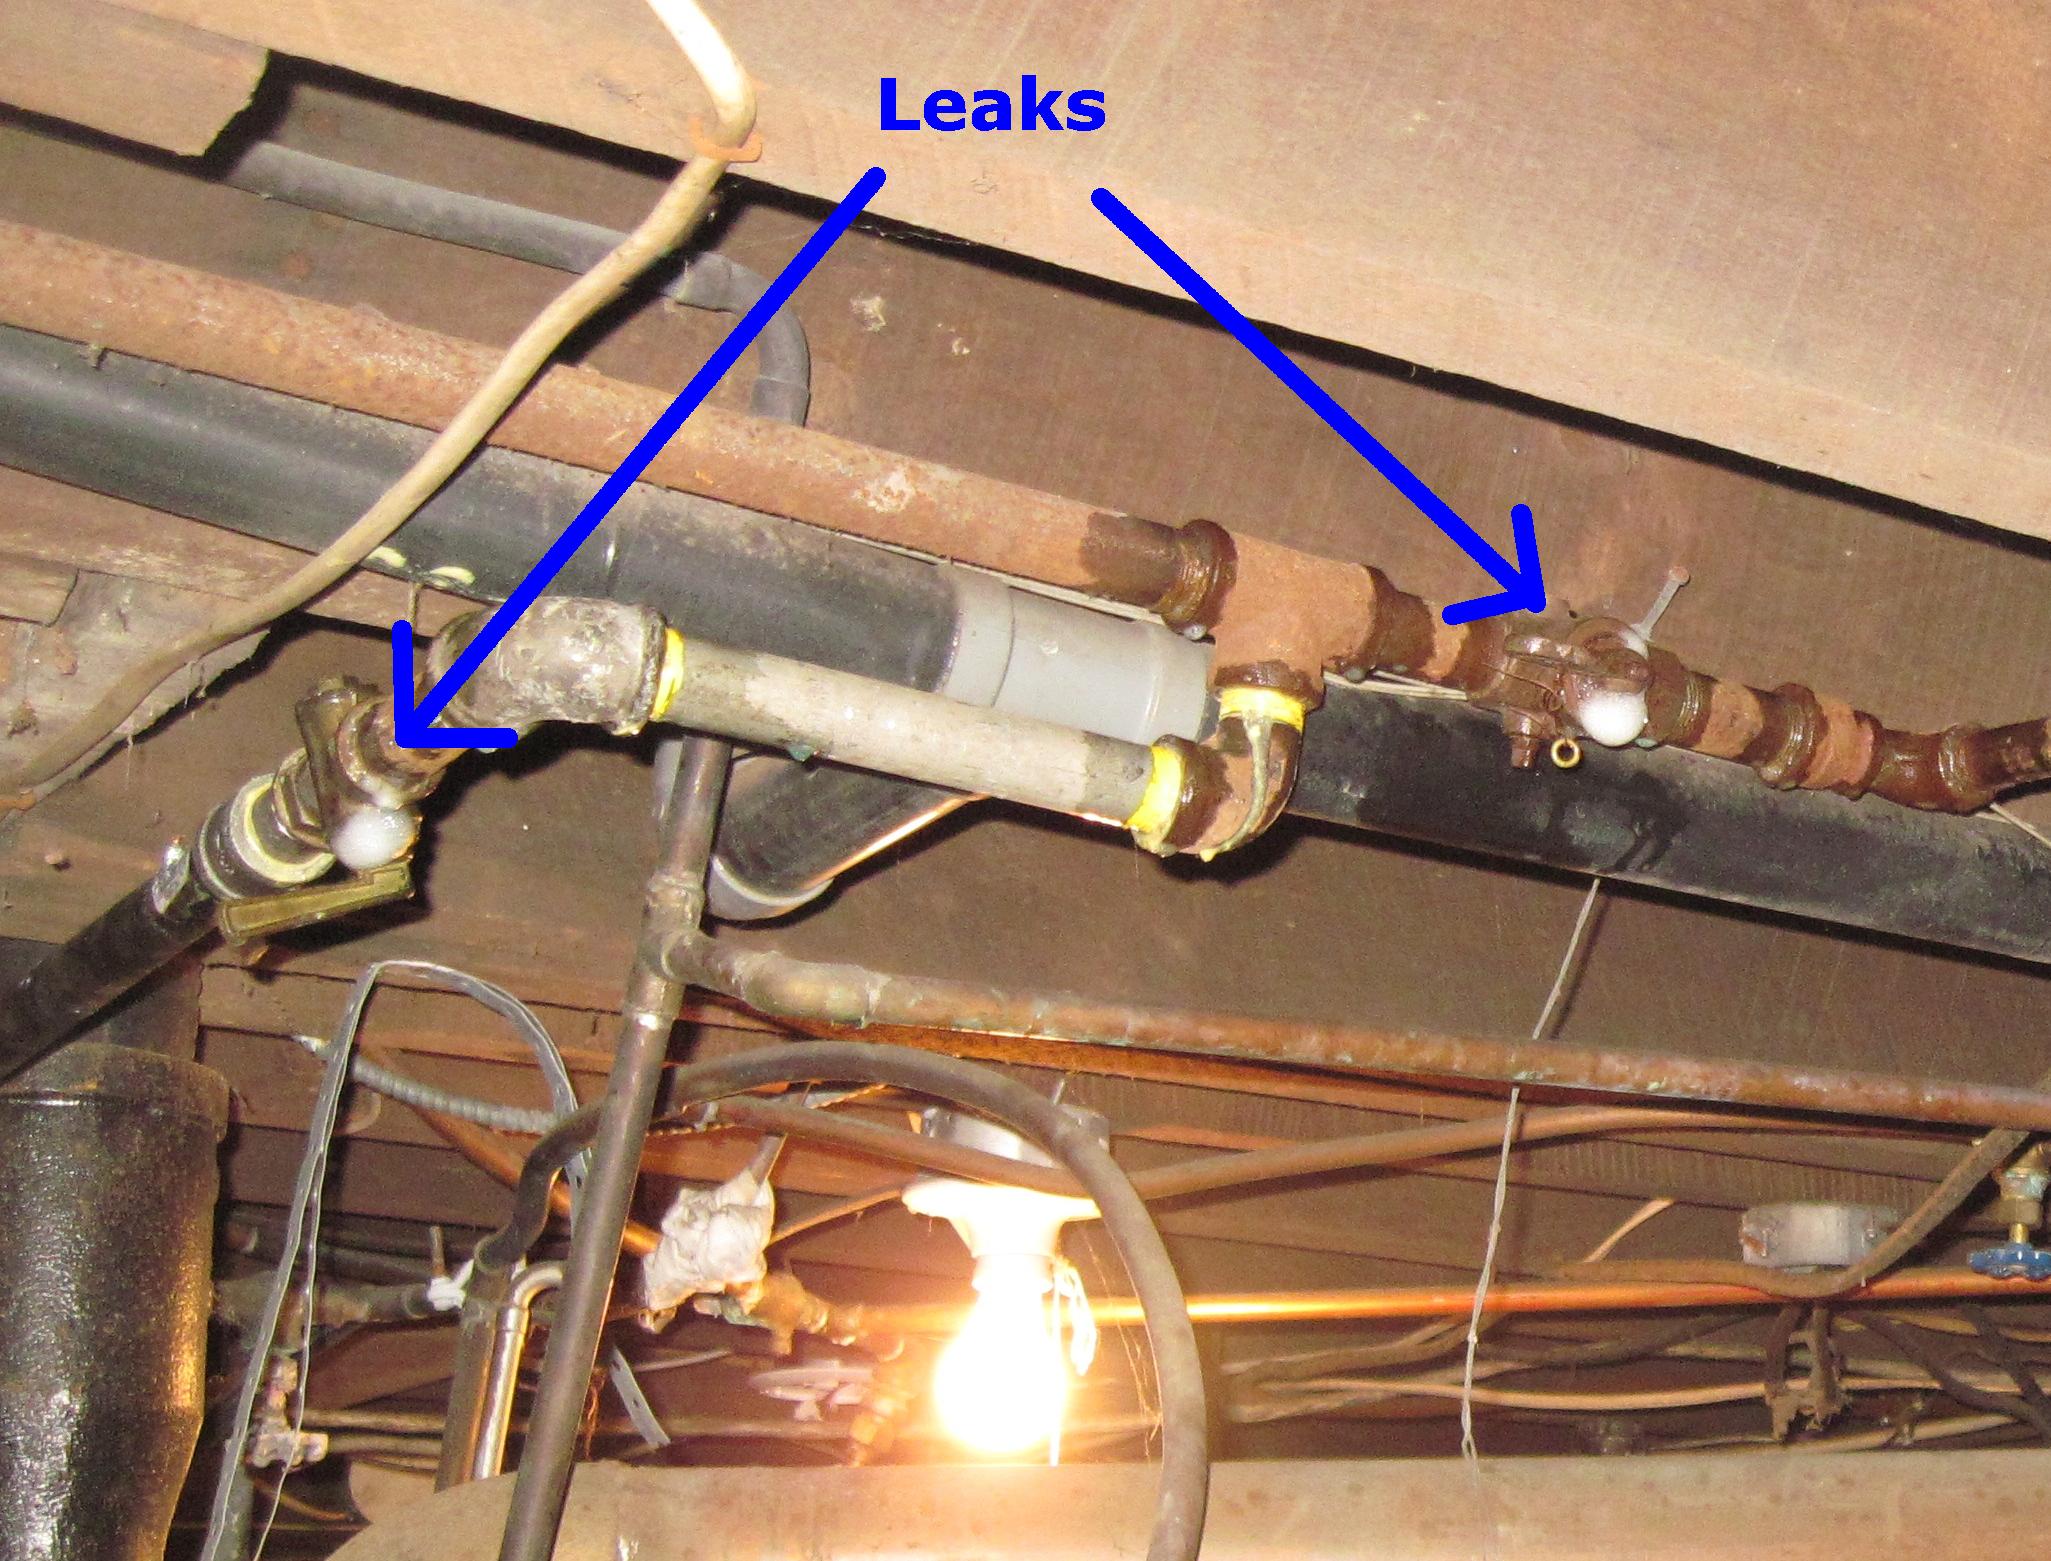
Well. I found 2 pretty decent leaks.  Of course, not anywhere that I can just tighten up. (yeah, I know it is possible to rebuild those shutoff valves but I'm just going to replace them) So, tomorrow after work, I will disassemble everything I need to to get those out. Then Saturday, we have to go to 'Bula, so I will stop at Home Depot and get what I need to replace those. So, hopefully by Saturday night I will have things buttoned up and a good pressure test. |
|
|
|
Post by bunbun / Hank on Jan 25, 2018 22:33:29 GMT -5
Looks like you've got a ball valve there. How the hell could you rebuild one of them? I've NEVER seen rebuild kits anywhere so you would have to buy another valve and gut it for the parts you need to fix yours, so it would just be simpler to install the new one and be done with it. no?
Good luck with this job as you'll probably have to tear out half the pipes in the house to access anything unless you just cut it and reconnect everything with Sharkbite fittings as the pipes look to be iron so you can't just solder the together with a union. You would have to thread them and that would be a royal pain in the ass.
HANK.
|
|
|
|
Post by Sir Trevor on Jan 26, 2018 21:04:56 GMT -5
That's why I am putting a new union in when I reassemble. And I didn't have to take too much apart.  Here is the basic layout of my gas lines. I already have the first union open and that is where my pressure gauge is. The furnace and HWT already have shutoffs and unions on their drops so it's easy to connect new ones. I just had to take that leg for the HWT apart. Which I had to do anyway to replace the one shutoff. Then I had to remove the stub-out that was there for the incinerator, which I already disconnected. That left me a long straight segment that I could spin off the other bad valve. Easier said than done though. That joint did not want to come apart, and I had little leverage or maneuverability up there in the floor joists. Especially with that black PVC line in the way (which is for the central vac that is in the house) But, it's all apart now. The ends of what I am going to reuse are already wire-brushed clean. After that, I spent some time undoing some of the plumbing. Which was a lot easier without the gas lines in the way. Especially since I was unsweating the joints. |
|
|
|
Post by Sir Trevor on Jan 28, 2018 1:37:32 GMT -5
 Well, that is done. And I pressure tested the lines and they are holding pressure just fine. So, I think my gas issues are taken care of. Now I just have to check and see if the gas company requires the work to be signed off by a pro before they will come back. On to the plumbing. Dale and I are going to pick up my new HWT tank tomorrow. I already put in a new tee where I removed the water softener (you can see it in that pic, just below the gas line). My laundry hook-up box should be here by Tuesday. So I should have the drywall ripped out so I can mount that, and fix the receptacle box (if I can sort out which breaker or fuse kills that circuit) Then I just have to finish up the utility sink connections. |
|
|
|
Post by bunbun / Hank on Jan 28, 2018 13:47:17 GMT -5
From what I can see in your enlarged photo that is the biggest rats nest of pipes running hither and yon I've ever seen. Maybe you need to tag them as to what goes where in case you ever have to make repairs in the future.
Your work looks to be OK but none of those water lines seem to be supported in any fashion. Some idiot just ran em from here to there without clamping them to a joist. Sorta reminds me of some of the plumbing work at our first house in Russell.
HANK.
|
|
|
|
Post by Sir Trevor on Jan 29, 2018 19:12:31 GMT -5
Oh yeah. You said it.
There are a few supports here and there, where they have wired up some of the plumbing, but most of it is just supported by the stiffness of the metal.
I added a few to the gas line as I was doing it.
And after I am done with the plumbing, I will be securing that as well. Already have the copper straps for it.
Oh, and as far as what is what. Should have seen before I started. Blue valves on hot and cold lines. Red valves on hot and cold lines.
I went through with 2 cans of spray paint (red and blue) and repainted them to correspond to their actual temperature. Did the same to some of the tees also. It was really messing with my head when I was trying to sort it all out and figure out my plan of attack.
The way they were ran didn't help in the least.
Here, in our current house, it was done right. Water comes in. Goes to HWT with a tee just above the tank.
From there, 2 lines (hot and cold) run together up until they need to split off to different things. When they split, they go together in pairs. And all along the runs there are metal tags stamped 'hot' hanging off the hot lines.
This new house, the water comes in at the front. The tank, and all the plumbing is in the back. So the front spigot tees off early. Then, as the supply line gets up by the chimney it tees off and goes off to the kitchen, bathroom, and laundry room, all by itself As well as teed off with a drop for the utility sink. Then it continues on to the HWT where it tees off and goes to the tank, doubles back on itself and loops around to run up to the second floor. Meanwhile there is yet another leg that runs to the other side of the house and goes up through the floor. I have no idea if that goes to the 2nd floor as well, or not.
Out of the HWT it splits almost immediately. One leg runs back towards the chimney, up to the rafters, then it loops back down comes back out tees to the kitchen, then loops back up to run up to the 2nd floor with the cold line.
The other leg, loops over tees off to the laundry room and over for the drop for the utility sink.
Meanwhile there are all these different shutoffs and couplings all over. Some are flared, some are compression, some are sweat joints, some are a mix. All the older lines are 1/2" The newer stuff is 3/8" (which apparently no one seems to carry fittings for). What really makes me scratch my head is when it goes from 1/2 to 3/8, then back to 1/2.
Oh yeah, almost forgot to mention the 2 or 3 dead runs also. Which are somewhat useful for draining the lines though.
It will just randomly tee off somewhere, go a foot or two, then into a shutoff with a short piece of cut off pipe sticking out the other end.
I saw all of this when we looked at the house, but all of it was sound.
It was one of those projects I was going to tackle 'down the road'. Well, with the gas line BS, it got moved up.
I've already got a small pile of copper lines I have removed and eliminated. With more to come.
I half considered making the investment of getting the tools to run PEX. But I am too old school and don't trust that stuff, or these 'sharkbites' that everyone keeps raving about. Sure, they might work now. But how is it going to hold up 20 years from now? If my sweat joints don't leak now, they aren't going to leak later either.
And as expensive as copper is now, it's still a whole lot cheaper than the brass compression fittings. If you can even find them anymore since most places thinned those out to make room for the pex, and push-to-connect.
The only flexible stuff is going to be the braided steel lines coming out of the HWT to connect to the old copper lines.
And if they start going bad, I'll just swap them out on one of the next tank changes. Since they don't make those like they used to anymore either.
|
|
|
|
Post by Sir Trevor on Jan 29, 2018 19:35:37 GMT -5
Also, if you haven't noticed in the pictures, all the wiring is ran on the bottom of the joists, instead of through them. So I have a bunch of that running around with the plumbing as well. Some of it I already ripped out. It wasn't even connected, but it was still hanging there. One piece ran all the way from the stairs over to the other side of the basement. And a bunch of it is grounded to the plumbing as well. So there is that to deal with. And when this all started there were also 3 clotheslines running under all this too. Those were the first to go, as they kept hitting me in the forehead. I dug around and found a few pics of some of this stuff before I started.  This one, in the middle/left you can see where it ran down to the water softener, to the right of the sewer stack are the lines that dropped down for the sink. And behind those you can see the old lead pipes that are god only knows how old. And I'm not touching them, because with my luck, I will break something in the wall because I am sure they run all the way to the 2nd floor. Oh, and right on top in the middle, you can see one of the lines to nowhere.  This is the spaghetti that came out of the HWT. Note, all those valves are color coded wrong. The red are on cold lines, and hte blue is on a hot line.  And this is where the gas line originally ran. It went around the water lines, and came across in front of the stack, on it's way over to the HWT. I shortened the drop, and ran it back towards the chimney so it runs straight across, behind the stack, and out of the way. Supported by metal strapping on both ends, so I didn't have to try holding it up all by myself to install. And to hold everything stable. You can also see in my 'fixed' photo that when I eliminated the water softener, I re-did that copper tee. Took the old one out, and put a new one in with a 90 degree rotation. That whole corner is really nice now. |
|
|
|
Post by Sir Trevor on Jan 31, 2018 19:23:43 GMT -5
Done! Well, done with the hard stuff. I still need to add some straps and such to sturdy things up to my standards. But all the lines are finished in the basement (for now) 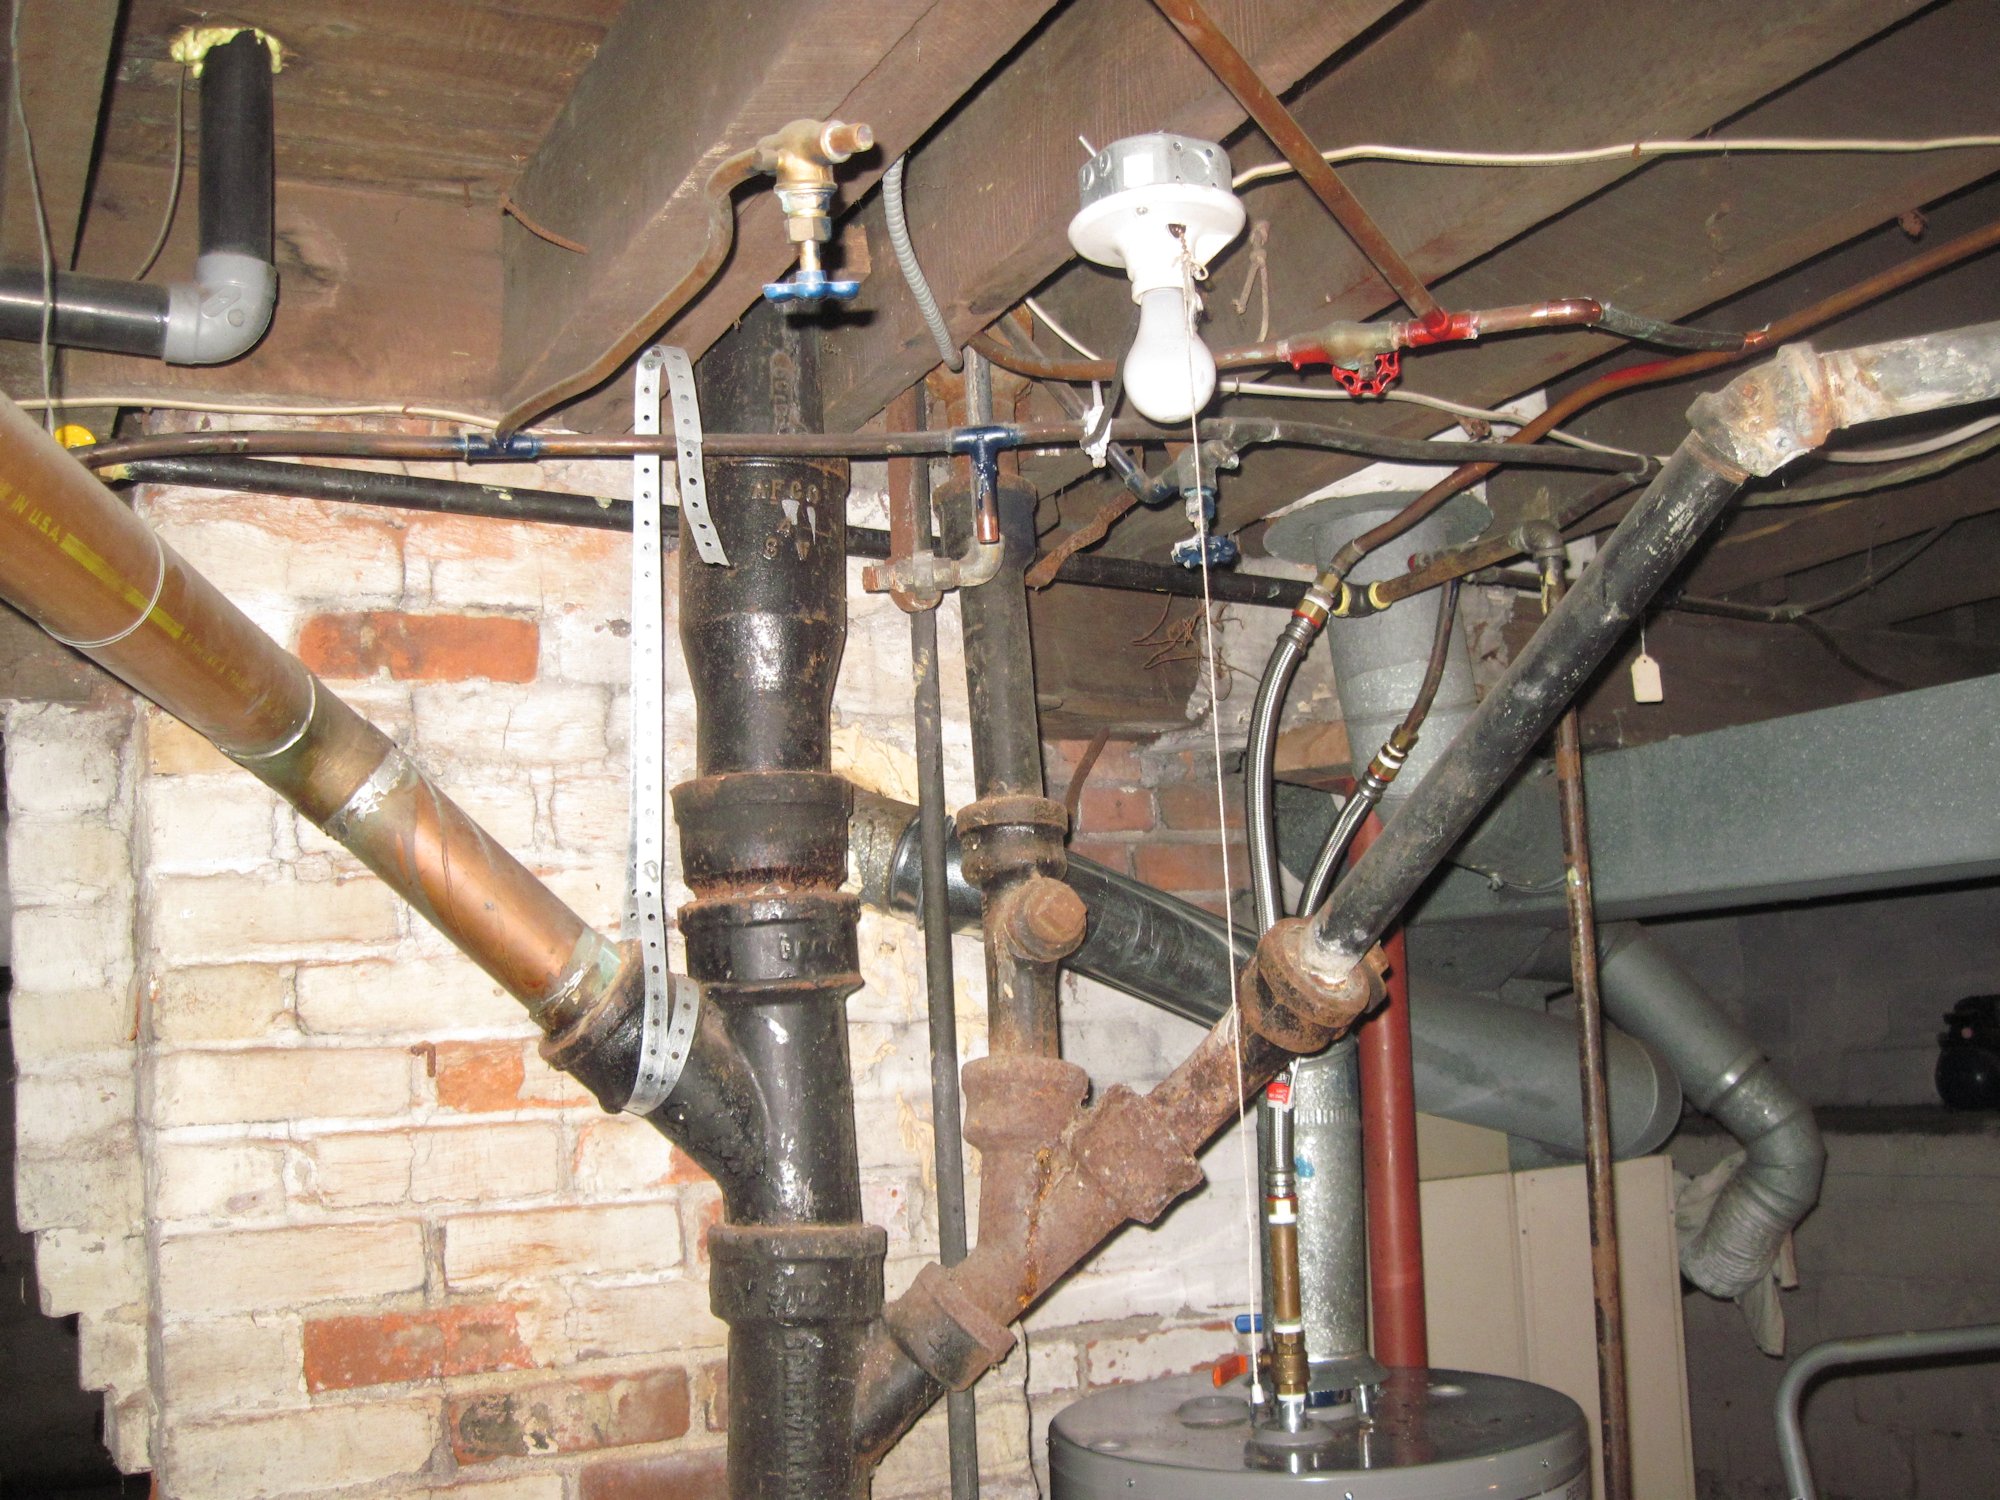 That was what it looked like when I dry-fit it last night. Tonight I sweated all the joints, and added the fitting for that stub-out, then pressure tested them. I turned off all the shutoff valves then turned the water on so I was only getting water down here where I did all the work. No leaks! Then I shut the water back off, and opened up the drains that I left in the lines. to drain it all out again so it won't freeze. Stopping at a local plumbing company tomorrow after work. Hopefully they pressure test residential gas lines and can file the paperwork for the gas company. If so, I can set up an appointment. |
|
|
|
Post by bunbun / Hank on Jan 31, 2018 20:41:40 GMT -5
LOL! Oh my God, who plumbed this place, the Three Stooges? I have NEVER seen so many bent and curved copper lines in my life. That was no professional job that is for sure. The only thing that even remotely looks professional is the big copper pipe going into the stack. Copper pipe that size must of cost a fortune. When we moved into our place we had to revamp that line a bit to drain the washing machine into the septic tank and we went with PVC. A LOT cheaper
So that line looks good. The rest of that mess (gas, water, electric) looks like it was done by Larry, Curly, and Moe while wearing blindfolds. Mike Holmes would loss his mind over this.
HANK.
|
|
|
|
Post by Sir Trevor on Feb 1, 2018 18:39:57 GMT -5
Mike Holmes would have ripped it all out and ran new.
I don't have that kind of budget.
Plumber is coming Tuesday afternoon to inspect and test the gas lines.
So hopefully we will have heat soon [fingers crossed]
|
|
|
|
Post by bunbun / Hank on Feb 2, 2018 11:17:19 GMT -5
Was talking with my friend Bob at the Y who is a retired plumber. He said scrape the copper, replace it all with PEX. The money you get for the copper will more then pay for the PEX and you'll probably still have money in your pocket, just sayin'
Are there any holes in the joists where the plumbing MIGHT have ran at one time? Cuz no way did a professional install that mess when the house was built. I'm thinking based upon the age of the house from your exterior photo that the plumbing was galvanized pipe at the time. Then at some point "The Idiot Brothers" ripped that out and installed this mess
Got luck with your heat. With heat in the house it will make other repairs more comfortable that is for sure. I would be surprised if you DON'T have a dozen water leaks when you turn that on, just based on the "high quality" of workmanship I see in your photos.
HANK.
|
|
|
|
Post by Sir Trevor on Feb 6, 2018 20:13:08 GMT -5
Well, no joy with the gas lines  Still have leaks. In the section I couldn't test (from the meter to the first union) Leaks start right outside just on my side of the meter. One elbow is leaking from both ends  Took a bunch of measurements. Put together a shopping list and ran up to Home Depot for everything today. Tomorrow after work I will start taking it all apart. I am hoping to have time to start putting stuff together, but I doubt that will happen. This crap always takes longer than you think it will. Just like putting it together. You think "Well, I'll just put this there, then add this, this, and this" But, by the time you tape the threads, add pipe dope, then torque each piece in place, next thing you know, an hour or more has gone by. Since I am doing all this, after work, and in the cold. Couple hours is all I have each night. I am replacing the whole run of 1" pipe and fittings, except for one piece. That is the one that runs under the porch and through the wall. It's an odd length. Pretty sure it is 104" but since I was measuring how far it sticks through the wall, my best guess at how thick the wall is, and the run under the porch, I didn't want to chance getting the wrong length. I'm gonna pull that out, wire brush the threads real good, and spray the whole thing with rust-reformer primer, then paint it before reattaching it. |
|